Thursday 13 August 2015

Lg G2 touch screen( touch digitizer) replacement

Phone repair requires patience. Lots of patience. If you don't want to go through all of the steps listed, then do not attempt this repair. I believe any one can do this if they go SLOWLY and they PAY ATTENTION to what they're doing. Ribbon cables are our friends as long as we respect them. I recommend using plastic spudgers for all ribbon cables. Be sure you're not touching the boards or any of the components on the boards. Hold all boards from the sides with your finger tips. Do not use metal prying tools inside of live phones unless you like dead phones. Proceed with patience and good luck :)

Image #1

Step 1  LCD and Digitizer 


Power down your phone.

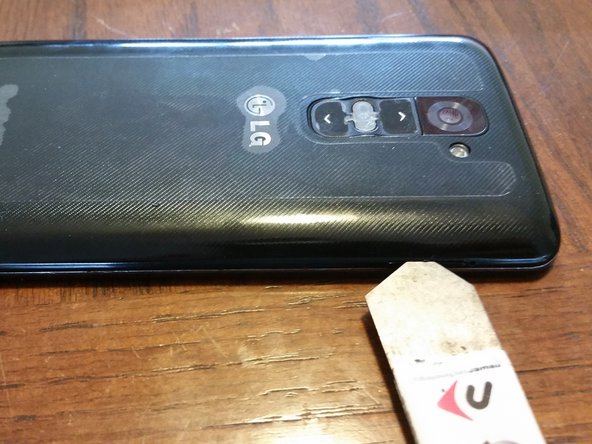
Slide your metal opening tool just above the drawer and push upward. Use gentle pressure (never force anything) and make your way around the perimeter of the device. The phone back is just clipped on—no adhesive here!


Image #1

Step 2 

Remove the 11 silver screws and one black (circled in yellow) holding the back case of the phone on. Remove all of these screws now.
The screws have different finishes and slightly different shapes. Make sure you organize them so that you can reassemble the phone correctly.


Image #1

Step 3 

The back case of the phone has two separate pieces; we will pry them up now. Slide the spudger under the back case (mind the motherboard under it so keep your clearance as high as possible).
Be sure you use gentle upwards pressure. iFixit Jedis know too much pressure results in poor repairs.


Image #1

Step 4 

Now that the back case has been completely removed, it's time to disconnect all the ribbon cables connected to the two boards.


Image #1


Step 5 

Disconnect the antennas from both sides of the top and bottom boards.
Be EXTREMELY careful separating these from the board! As you can see in the second picture these aren't held down to the board well (and after 8 years of fixing phones even the best Jedi can still exert too much of the force)


Image #1


Step 6 


On the bottom-left side of the phone is a little board that goes with this dual-ribbon board contraption. Be sure you give him a little push with your plastic prying tool, it'll eventually come loose.

Gently lift the board from the top with the power button/volume assembly in your fingers, now pry the bottom part of the board free of the phone housing.

The cables on the bottom can get caught on the bottom board, just be gentle as you lift it out of the phone.
In picture 4 there is a red box around a little plastic piece that comes with this assembly. Remember this tucks UNDER the board once you're putting it back in


Image #2


Step 7

Make absolutely sure all of your ribbon cables are free of the board. Use your plastic prying tool and lift up on the board. If all cables are out of the way it will come free.


Image #1


Step 8

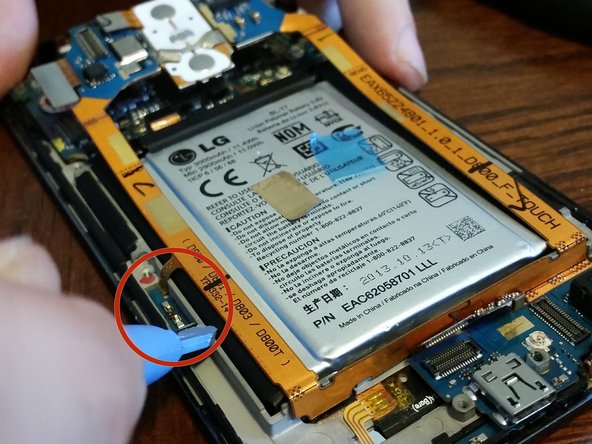
Gotta get that battery out of there now. Heat and batteries don't mix. For this one I used a sturdier metal prying tool to CAREFULLY slide under the battery to free it from the adhesive.


Image #1

Step 9 


Ready to get hot and steamy? Get out that heat gun baby!

Keep your heat gun about 4-6 inches above the screen of the phone and make even passes back and forth over the glass. Keep the heat on it for 1-2 minutes.

Now let's get that screen


Image #1


Step 10


Take a thin prying tool and slide it between the glass and the plastic housing of the phone.

I found it rather easy to remove this screen (versus, say, a Galaxy S4) so it shouldn't take too much pressure to get the screen up.

Go around the perimeter of the phone and lift the glass free. Do not slide your opening tool in too deep while doing this. There is a cable in the upper-right corner and a wider, flat cable with two connectors on the bottom towards the middle of the screen.

Carefully pry the ribbon glued down on the inside opposite the screen. Once that is free slide it AND the small connector through the case just to the side of it out to free up the screen to remove.

Be sure when replacing the screen to use a good bit of double sided tape. I had problems with the bottom right corner coming up and had to disassemble and reapply tape.


Image #1

Step 11 


Problems? When I replaced this screen I couldn't get it to come on at first. If this happens, hold the volume down and power buttons simultaneously.
This will reset the phone and hopefully get it to recognize that new screen.
When re-assembling the device, there is a chance your clips will not fit correctly over the volume and power button faceplate. A little force around it should snap them together.


u can buy here -

lg g2 d802, 805 touch

lg g2 d800, 803, ls980, d801

lg g2 d802 touch


                                           TEJWANT GOSAL
who loves everything about technology. He is devoted to everything that is tech-related and tries the best to produce useful and quality BLOGS about mobiles,


Sunday 2 August 2015

Improve LG G2 Camera Picture Quality with Camera Mod

improve-lg-g2-camera

The LG G2 is an awesome device with stunning hardware specs. It has been months since the device was released and even in this short period, G2 has gained much popularity. It has earned what LG had been seeking for a long time.
While the LG G2 packs a really good camera with decent output, it is felt that LG could have done even better to improve the camera picture quality. Actually, the problem lies somewhere the camera tuning. If you own an LG G2 or LG G Flex and feel that its picture quality is not as good as it should have been, we have discovered a working solution to improve LG G2 camera quality.
Jishnu Sur™ from XDA developers, who has already released a camera mod for the Nexus 5, has prepared another such mod that brings significant improvement in the camera of the LG G2. Jishnu has discovered the missing ideal configuration and perfected it to the best level possible.

Features of LG G2 Camera Mod:

Jishnu Sur’s camera mod for the LG G2 has come a long way since it was first released. It has seen so many updates and the long list of its features alludes to that:
  • Faster shooting of pictures
  • 1080p videos are now shot @ 30MB/s
  • 720p videos are now shot @ 20MB/s
  • ISO option available in Settings
  • Decreased the max ISO to 1200 from 1600 (the more the ISO the more the noise in the picture)
  • Increased the sharpness from 90 to 95
  • Increased the JPEG preview quality to 99 from 90
  • Increased the minimum FPS of the 1080p video to 25 & Max to 40 FPS
  • Adjusted ISO to Max 200 for face detection.
  • Enhanced smooth zoom
  • Decreased the bitrates of the videos as follows:1080@60 FPS : 20MB/s
  • Video size: 1080@30 FPS : 30MB/s.
  • Video size: 720@30 FPS : 20MB/s.
  • Set JPEG Quality to 100% and JPEG compression to NIL
  • Set sound Bitrate to 256Kbit/s like Nokia Lumia 1020
  • Image sharpness increased to 99
  • Video Sharpness increased from 20 to 22
  •  60FPS video recording with better bitrate and quality
  • Low light videos should have a stable 30 FPS constant
  • 1080P & 720P Videos has HFR options.
  • Back Camera Records 720P Videos @ 90 FPS
  • Front camera records 1080P Videos @ 60 FPS
  • Sharper pictures in both cameras
  • JPEG quality increased to max
  • Sharpness Increased for front camera
  • The latest updated version of the mod for KitKat based ROMs features:
    • 4K video recording
    • 120 FPS video recording enabled
    • JPEG Compression is zero

Downloads:

For JB Based Stock ROM: Camera_Mod_G2_V_2.5.6 EXPT_4.zip
For KitKat Based Stock ROM (test version): V3.1 KK.rar
For AOSP/CM/Omni ROM: LG_Camera_F40_for_G2.zip

Requirements:

  • LG G2 or LG G Flex (any variant)
  • Root access
  • CWM/TWRP Recovery

How to Install:

Having downloaded the camera mod from above, here’s how you can install it on your LG G2.

Instructions for Stock-Based ROMs

  1. Download and copy ZIP file to your phone.
  2. Install a root file explorer app from the Play Store: 
    Root BrowserJRummy Apps Inc.Productivity0Download
  3. Open Root Browser and navigate to system/app directory
  4. Find the following 2 files:
    • CameraApp.apk
    • CameraApp.odex
  5. Rename these files as:
    • CameraApp.apk.bak
    • CameraApp.odex.bak
  6. Now boot your LG G2 into TWRP/CWM recovery mode.
  7. Backup your current ROM before doing anything.
  8. Tap the Install option and select the camera mod zip file.
  9. Confirm installation and then reboot your phone.
  10. If you do not have a custom recovery on your device,
    1. Extract the downloaded ZIP and copy the APK to phone.
    2. Open Root Browser and go to system/app.
    3. Find CameraApp.apk and CameraApp.odex and add a .bak extension to both of them.
    4. Now copy the new CameraApp.apk to system/app folder.
    5. Press and hold CameraApp.apk and select Permissions from the list of options.
    6. Now set the permission to rw-r–r– (0644).
    7. Then reboot the phone.
  11. When your LG G2 boots up, you would be able to use the modded camera app on your phone.

Instructions for AOSP/CM Based ROMs

  1. Reboot in CWM/TWRP recovery.
  2. Backup your current ROM.
  3. Tap the Install option and select the camera mod zip file.
  4. Confirm installation and then reboot your phone.
With a hope that the LG G2 camera mod by Jishnu brings noticeable difference to the camera picture quality of your LG G2 or G Flex, we wind up our guide here. Do not forget to share your feedback and experiences with us. Cheers!

Additional downlods

Root BrowserJRummy Apps Inc.Productivity0Download
Root ExplorerSpeed SoftwareProductivity$3.99Download
Also install BusyBox app on your device:

                                           
                                           TEJWANT GOSAL
who loves everything about technology. He is devoted to everything that is tech-related and tries the best to produce useful and quality BLOGS about mobiles,


Saturday 1 August 2015

LG G2 dock flex cable d800 and 802 PARTS AVAILABILITY


The major issue with lg g2 i've found recently was parts availability. i was using lg g2 d800.
my mobiles dock flex cable was damaged due to charger. then my phone started restarting itself and after few days it sopped working means dead then i contacted lg customer care India. they told me that it will take 15 to 20 days to get that part. after 20 days i visited lg care they said that lg g2 d800 dock flex cable is not available anywhere in India. i was very upset then i searched online but after wasting lots of time i found that all parts are available outside India and the parts(flex cable) are different from each other for example lg g2 d800 and d802 have different dock flex cable and touch digitizer and LCD are different too. they look similar but look at the images


lg g2 d802 jack is small


lg g2 d800 jack is large


and if you are in India or anywhere else where you cant get this cable then you can order online here. i am not promoting any site but its my personal experience.you can get this here. and price is cheaper too. i've already ordered via Singapore post (250 inr) extra. chek model no. on cable before you order.


                                           TEJWANT GOSAL
who loves everything about technology. He is devoted to everything that is tech-related and tries the best to produce useful and quality BLOGS about mobiles,


LG G2 Android 5.0 Lollipop Bugs And Performance Issues


LG has rolled out Android 5.0.2 Lollipop for owners of the LG G2, and while a lot of owners of the Korean smartphone maker's two-year-old device are excited to get the update, many people have also reported plenty of issues, ranging from minor inconveniences to major headaches that have their phones ending up useless.
Among the most common major issues reported by many users is the poor battery life and sluggish charging. Some users complain that the battery life on their G2 has significantly shortened compared to the battery life when their phones were running on Android 4.4 KitKat. One user cites an extreme example, saying his G2 now only lasts three and a half hours on a single charge, but many users who have similar but not as severe experiences say battery life has shortened by about half the normal time.
"Got my VZW LG G2 (VS980) Lollipop 5.0.2," says. "I heard the battery life was horrible but never expected it to be this bad... What the heck, LG"
Android Lollipop is supposed to increase efficiency in charging, but many users report much slower charging for their updated G2s.
"I'm having real battery problems on the official Lollipop ROM from Droidth. When using GPS in my car, the battery is discharging even when plugged in," says Andy Long. "Is there anything that can be done to fix this? It's useless if I can't use it as a GPS on a journey!"
There are, however, many users who say they are having no battery problems on Android Lollipop. For instance, Bojan Tomic says his phone still had 46 percent of battery even after 13 hours of usage, with Wi-Fi constantly on and 50 percent of brightness while also spending some time exploring the new Lollipop features.

Other people have also reported the update interfering with their ability to send texts, make calls, or use their network's mobile data.

"So recently, my LG G2 has been having problems when making and receiving calls. The person on the other line can't hear me at all," says Malachi O'Hagan. "I thought it was a microphone problem. However, this [isn't] the case when I use speakerphone to make calls."
Some users think the problem has to do with Google Now, so they deactivated voice recognition on the app and voice improvement in the caller app and found they could make calls again. Others say the solution is not working for them, though.

It seems the process of upgrading to Android Lollipop is also rife with bugs, as many users report their phones suddenly stopped working in the middle of a system update or their phones showed Android KitKat even after it said it had successfully updated. One user, Arvin Nocon, says he accidentally flashed Android Lollipop and now his phone is stuck in fastboot mode and will not connect to a computer and has no recovery mode.

"I have LG G2 V980. I got the update and it finished installing but nothing has changed," says Stevie Archie. "When I look in my settings and the Android version, it still says 4.4.2, and when I go to System update it force closes."

Other irritating but not as frustrating issues include screens no longer rotating on Android Lollipop, the keyboard being slow or sometimes not appearing in some apps and not showing the arrow keys in other apps, the Power Off and Restart command shutting down the phone but not restarting it, and the ability to edit photos in the Gallery no longer available.

Neither Verizon nor LG has offered a solution, and Google has always kept mum on the bugs plaguing Android Lollipop, but many users suggest that restarting the phone can sometimes clear some of the problems. If not, though, one can always try clearing the cache and, if nothing happens, many say doing a factory reset pretty much solves nearly every problem. Just be sure to back up all important files before resetting the phone to its factory settings.

READ THIS FOR SOLUTIONS  LG G2 BUGS AND SOLUTIONS


                                           TEJWANT GOSAL
who loves everything about technology. He is devoted to everything that is tech-related and tries the best to produce useful and quality BLOGS about mobiles,